I’m really excited to share this pattern I designed, I think it’s really unique and super fun! And there are so many ways you can personalize it. Read on for the pattern and instructional video!
Inspiration
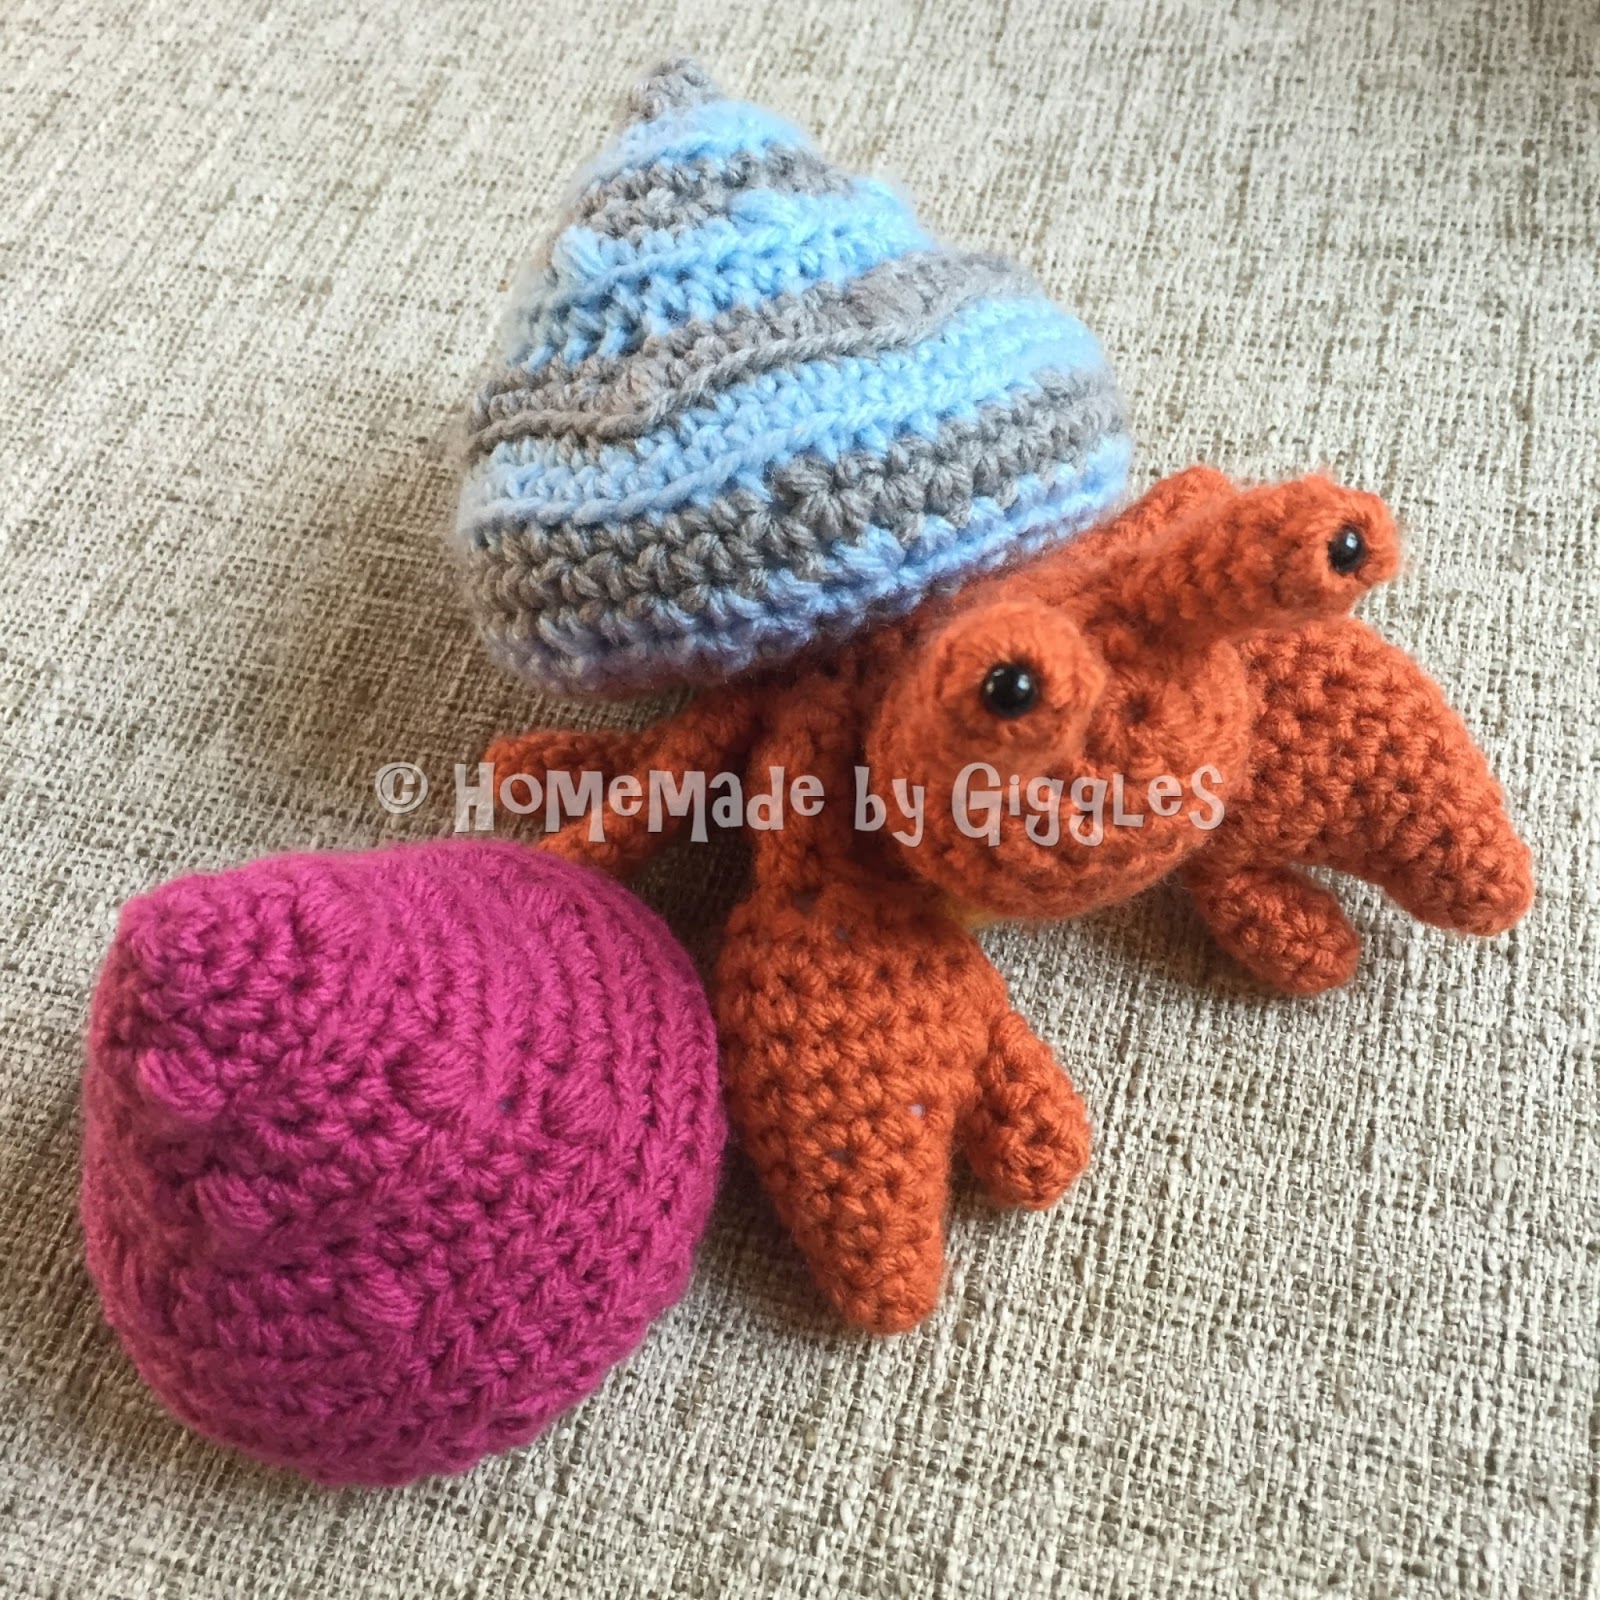
My sister gave my daughter some sea shells from a trip to Cuba, and she just loved them. We had recently seen an episode of a kid’s show that had hermit crabs, so we looked online to see hermit crabs and found a few pictures of hermit crabs wearing shells just like hers! So I thought I’d make her a crocheted crab for her, finding some way to make the shells removable. And here is the result, please enjoy this pattern, including a couple of shell possibilities. I would LOVE to have comments and pictures of other shells people create, the possibilities are endless!!
** Updates September, 2016: Based on many requests, I’ve added an assembly video to the blog, you can find it in the Assembly section below. I’ve also added details about the construction of the claw as I know it’s a more difficult piece to visualize. As always, let me know if you have any questions!
Materials
4 mm crochet hook
Worsted weight yarn of your choice, I used Bernat Super Value
2 x 6mm safety eyes
Tapestry needle
Stuffing material: bean bag filling and batting (can use just one or the other)
puff stitch – *yo, insert into st, pull yarn through* 3 times, yo and pull through all loops on hook
General note: after the first round, the pieces are worked in a continuous fashion – you do not need to sl st at the end of each round. Because of this, I recommend you use a stitch marker to keep track of where the current round started, in case you lose count during a round.
Hermit Crab Pattern
Body:
Round 1: 6 sc into magic ring, sl st into first st
Round 2: 2 sc in each st around (12 st)
Round 3: *2 sc in next st, sc in next st* repeat until end of round (18 st)
Round 4: *2 sc in next st, sc in next 2 st* repeat until end of round (24 st)
Round 5: sc in each st around
Rounds 6-9: repeat Round 5 (24 st)
Round 10: *sc2tog, sc in next 2 st* repeat until end of round (18 st)
Add stuffing at this point – I used a fabric bag with bean bag poly-fil filling to keep it weighted
Round 11: *sc2tog, sc in next st* repeat until end of round (12 st)
Round 12: sc2tog around (6 st)
sl st, fasten off, leaving a tail for sewing
Sew small opening shut and weave in ends
Belly:in contrasting color
Round 1: 6 sc into magic ring, sl st into first st
Round 2: 2 sc in each st around (12 st)
Round 3: *2 sc in next st, sc in next st* repeat until end of round (18 st)
Round 4: *2 sc in next st, sc in next 2 st* repeat until end of round (24 st)
sl st, fasten off, leaving a long tail for sewing
Head:
Round 1: 6 sc into magic ring, sl st into first st
Round 2: 2 sc in each st around (12 st)
Round 3: *2 sc in next st, sc in next st* repeat until end of round (18 st)
Round 4: *2 sc in next st, sc in next 2 st* repeat until end of round (24 st)
Round 5: sc in each st around
Rounds 6-8: repeat Round 5 (24 st)
Round 9: *sc2tog, sc in next 2 st* repeat until end of round (18 st)
Add stuffing at this point – I used batting
Round 10: *sc2tog, sc in next st* repeat until end of round (12 st)
Round 11: sc2tog around (6 st)
sl st, fasten off, leaving a tail for sewing
Sew small opening shut and weave in ends
Eyes:make 2
Round 1: 6 sc into magic ring, sl st into first st
Round 2: sc in each st around
Rounds 3-6: repeat Round 2 (6 st)
sl st, fasten off, leaving a tail for sewing
Attach safety eyes to the magic ring – note you may need to do this after round 3ish to be able to squeeze it tight properly
Tail:will hold the shells in place
Round 1: 6 sc into magic ring, sl st into first st
Round 2: sc in each st around
Round 3: repeat Round 2 (6 st)
Round 4: 2sc in each st around (12 st)
Rounds 5-7: repeat Round 2 (12 st)
Round 8: *2 sc in next st, sc in next st* repeat until end of round (18 st)
Rounds 9-12: repeat Round 2 (18 st)
Add stuffing at this point – I used batting
Round 13: sc2tog around (9 st)
Round 14: *sc2tog, sc in next st* repeat until end of round (6 st)
sl st, fasten off, leaving a long tail for sewing
Leg:make 4
Round 1: 6 sc into magic ring, sl st into first st
Round 2: sc in each st around
Rounds 3-10: repeat Round 2 (6 st)
sl st, fasten off, leaving a tail for sewing
Claw:make 2 (See below for extra pictures and info about the construction of the claw)
Round 1: 6 sc into magic ring, sl st into first st
Round 2: sc in each st around
Round 3: repeat Round 2 (6 st)
Round 4: *2sc in next st, sc in next st* repeat until end of round (9 st)
Rounds 5-6: repeat Round 2 (9 st)
Round 7: *2sc in next st, sc in next 2 st* repeat until end of round (12 st)
Round 8: 2sc in each of next 4 st, sc in each remaining st (16 st)
Round 9: sc in next 2 st, 2sc in each of next 4 st, sc in each remaining st (20 st)
Add stuffing at this point – I used batting
Round 10: sc2tog 5 times, sc in each remaining st (15 st)
Round 11: sc2tog 3 times, sc in each remaining st (12 st)
Round 12: sc2tog around (6 st)
Rounds 13-16: repeat Round 2 (6 st)
sl st, fasten off, leaving a tail for sewing
SEPARATELY…
Round 1: 6 sc into magic ring, sl st into first st
Round 2: sc in each st around
Round 3-4: repeat Round 2 (6 st)
sl st, fasten off, leaving a tail for sewing
Sew this small piece onto the increase areas of the big claw piece (on rounds 8-9) to complete the claw
Claw construction – additional tutorial
I’ve received a couple questions about the claw specifically, so have taken some pictures along the way to help understand the claw construction.
Above is the claw at the end of round 7, which is where it starts to get trickier.
Above is the claw after round 8, you ca see that one side is starting to expand out while the other stays flush with the previous round. This is where the claw shaping really begins.
Above is the claw after round 9. The jut out on one side is much more defined. This is where you add the stuffing as you will begin to decrease in the next round.
Above is after round 10, shape is starting to decrease again.
Above is after round 11.
Above is after round 12. At this point there are 6 sc left and you simply sc around for 4 rounds to finish the arm.
Finished the main piece of the claw.
Here is the extra “thumb” of the claw, crocheted separately.
You stitch the “thumb” onto the main piece to form the full claw and you’re done!
Hermit Crab Assembly
Sew the belly onto the body, centered over the bottom of the body (this helps cover up any gaps created by the decrease rounds of the body)
Attach the tail centered over the magic ring of the body
Sew the head onto the body at the angle pictured
Sew eyes onto head so they point upwards on the head
Attach claws between the head and the tail, one on each side so they mirror each other. With the claws, the arms themselves shouldn’t be stuffed and when you attach them you should sew them so that they aim down against the body
Sew the legs in place around the base of the tail, spacing them evenly along each side
Weave in loose ends and optionally embroider a smile on the little guy! I tried one out but didn’t think it worked with my crab!
I’m happy to announce that I’ve made a video of the assembly, as several people had requested it. Here it is!
Shell Patterns
Note: I googled a couple shells and do not in any way claim that I created these solely out of my own imagination! I’ve added links where I can to things I’ve reference.
Spiral Shell:
Ch 101, sc in 2nd ch from hook and next 29 ch, hdc in next 30 ch, dc in next 40 ch.
Fasten off.
Starting with the sc portion, wrap the shell around the shape of the tail of the crab, sewing as you go.
Weave in loose ends and VOILA! A snug little spiral shell.
Puff Shell:
For this shell, I used the Sea Songs Conch Shell pattern from Yarnspirations online (free!) and made modifications to fit it to my crab. I decided to alternate colors every 2 rows just to mix it up! It is stuffed for fullness.
Round 1: 6 sc in magic ring, sl st into first st
Round 2: sc in each st around (6 st)
Round 3: 2sc in each st around (12 st)
Round 4: *sc in next 2 st, 2sc in next st, puff st in next st* repeat until end of round (15 st)
Round 5: sc in back loop only of each st around
Round 6: *2sc in next st, sc in next 2 st* repeat until end of round (20 st)
Round 7: *sc in next 2 st, 2sc in next st, puff st in next st* repeat until end of round (25 st)
Round 8: repeat Round 5 (25 st)
Round 9: *2sc in next st, sc in next 4 st* repeat until end of round (30 st)
Round 10: *sc in next 3 st, 2sc in next st, puff st in next st* repeat until end of round (36 st)
Rounds 11-12: repeat Round 5 (36 st)
Round 13: *sc2tog in back loops only, sc in back loops only in next 4 st* repeat until end of round (30 st)
Round 14: sc in each st around (30 st)
Round 15: *sc2tog, sc in next 4 st* repeat until end of round (25 st)
Round 16: repeat Round 14 (25 st)
Round 17: *sc2tog, sc in next 3 st* repeat until end of round (20 st)
Round 18: repeat Round 14 (20 st)
Round 19: *sc2tog, sc in next 2 st* repeat until end of round (15 st)
sl st, fasten off
SEPARATELY… mimick the tail pattern
Round 1: 6 sc into magic ring, sl st into first st
Round 2: sc in each st around
Round 3: repeat Round 2 (6 st)
Round 4: 2sc in each st around (12 st)
Rounds 5-7: repeat Round 2 (12 st)
Round 8: *2 sc in next st, sc in next st* repeat until end of round (18 st)
Rounds 9-14: repeat Round 2 (18 st)
sl st, fasten off leaving long tail for sewing
Stuff the big shell piece and sew smaller piece, connecting the openings to make a spot for the shell to slip onto the tail of the crab
Weave in loose ends.
Detailed Assembly Instructions for Puff Shell
Unassembled shell, bottom
Unassembled shell, side
Completed shell inside piece (‘tail’)
Stuff the outside shell, leaving lots of room for the inside piece
Place inside piece into the shell
Sew the pieces together
Weave in any loose ends, completed shell
Top view of completed shell
Enjoy your shell!
Snail Shell:
For this pattern I roughly mimicked this pin on Pinterest, which links to a site in German. I cannot tell if this is a pattern being sold – if it is PLEASE let me know and I will immediately remove my pattern below! I just looked at the picture and kind of made it up as I went along, so I’ll share how I did it and take it from there…
Round 1: 6 sc in magic ring, sl st into first st
Round 2: sc in each st around
Rounds 3-11: repeat Round 2 (6 st)
Round 12: *2sc in next st, sc in next st* repeat until end of round (9 st)
Rounds 13-22: repeat Round 2 (9 st)
Round 23: *2sc in next st, sc in next 2 st* repeat until end of round (12 st)
Rounds 24-25: repeat Round 2 (12 st)
Round 26: *2sc in next st, sc in next 3 st* repeat until end of round (15 st)
Round 27: repeat Round 2 (15 st)
Round 28: *2sc in next st, sc in next 4 st* repeat until end of round (18 st)
Round 29: *2sc in next st, sc in next 5 st* repeat until end of round (21 st)
Round 30: *2sc in next st, sc in next 6 st* repeat until end of round (24 st)
Round 31: *2sc in next st, sc in next 7 st* repeat until end of round (27 st)
Round 32: *2sc in next st, sc in next 8 st* repeat until end of round (30 st)
Round 33: *2sc in next st, sc in next 9 st* repeat until end of round (33 st)
Round 34: repeat Round 2 (33 st)
Round 35: *ch3, sc in next st* repeat until end of round (33 ch3 loops)
Round 36: working on underside of shell, sc around the stitches from Round 34 (approx 30 st)
Round 37: sc2tog around (approx 15 st)
Round 38: *sc2tog, sc in next st* repeat until end of round (approx 10 st)
sl st, fasten off
Weave in loose ends
And there you have it! Just a couple shell options. I’m sure there are some great options using little squares or hexagons, or doing more braided or spiral work! Just ensure you design something in a way that will allow the tail to fit in snuggly for play time! Please post pics on Ravelry so I can see finished products!
Please feel free to make and sell items made from this pattern, but please link back to my post if you do. Please do not copy my pattern and claim it as your own, or publish the pattern elsewhere without permission. Happy crafting!
Looking forward to trying this pattern for my granddaughter. You have done a fantastic job making the instructions clear and concise and easy to follow. Thank you sooo much!


 Above is the claw at the end of round 7, which is where it starts to get trickier.


This pattern is Awesome!! Thanks so much for sharing it.
Looking forward to trying this pattern for my granddaughter. You have done a fantastic job making the instructions clear and concise and easy to follow. Thank you sooo much!
Such a fashionable hermit crab! Thank you for the pattern.
Muchas GRACIAS por compartirlas.. es muy hermoso gran trabajo….
Yes would love it if there's a video of how to make this ! THANK YOU.
This comment has been removed by the author.
Yes! a video PLEASE !!!:)
Hi Nixie, I've posted a video on this blog post for you with the assembly instructions! Happy crafting!
Hi there, I've posted a video on this blog post for you with the assembly instructions! Happy crafting!
Just adorable. Thank you so much for sharing it freely.